I have set up a simple test map consisting of a few slabs of
BSP, a skylight, a playerstart, a skydome, and a directional
light.
I will primarily be using default editor assets which can be
found in the EditorMeshes and EditorMaterials
packages. For this example, I also grabbed a flat sheet static
mesh, and a water-like material.
After much experimentation and back-and-forth with SkullKrusher101,
we've discovered that the most ideal way to work with rising/falling
water, or other liquids, is not workable. We found that very
few volumes have a 'Movement' property inside them which is
the key to making much of anything move in the editor. So after
experiemnting with different techiniques, different volumes,
and some Kismet variations, our conclusion is that there's no
easy way to do it.
And so, until someone comes up with a better way, we have determined
that the only current method for rising/falling water/liquid
is the following:
*Note: It is assumed that you are already familiar with creating
water in the editor. Remember - water is a combination of two
pieces: a volume (which handles the physics, particles, and
sounds) and a surface - usually a static mesh - which makes
the water look like water when viewed from above (and, ideally,
below). The shape of the liquid is defined by it's surface mesh,
it's volume shape, and/or its physical boundaries (BSP, other
meshes, and/or terrain).
Let's use the 'Cooking' analogy I outlined in the Applications
Introduction to set this up:
1) What are we making?
A pool that the player can raise and lower using "use'
Switches.
2) Gather the ingredients:
2 Triggers
2 Interpactors (water sheets)
2 Matinees
2 Trigger 'Used' Events
2 Toggle Actions
3) Put it together.
In the level, I have set up some BSP to
be a small boxy pool. I am going to set up the system to 'turn
on' the water when I hit a switch at the bottom of the 'pool'
and then the water will rise, and I'll be able to climb out
again. Once the water is up, I'll be able to use the switch
at the top to 'drain' it again.
|

|
On the Kismet side of things, I'm just going to deal with the
basic mover setup first. I'm using two interpactor sheets because
the material I chose was one-sided, as is the mesh. So I took
one, flipped it upside down, and placed it just slightly below
the first one. This way, we'll get a water surface looking down
at the water, but also looking up at it from below.
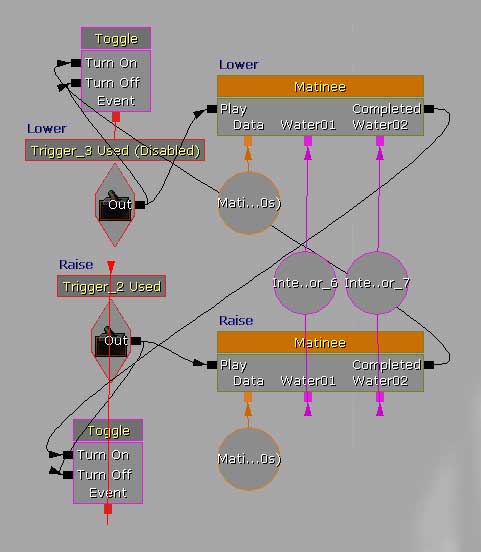
First, I set off the trigger Used Events to play a raising matinee
for the lower trigger, and a lowering matinee for the upper
trigger. In the matinee, I used two movement groups - one for
each water plane - and set their movement tracks to 'World Frame'.
Then, I used each 'Completed' of the matinees to turn on the
appropriate trigger. The matinees have both been set to 'RewindonPlay'.
The trigger events are each set to turn themselves off as soon
as they're activated using toggles. The trigger event that will
lower the water is set to 'off' by default using it's bEnabled
property.
|
|
Now we need to work in the Dynamic Water Volumes. So we're going
to repeat step 2 with extra ingrediants:
2) Gather the ingredients:
4 Dynamic Water Volumes
9 Toggles
8 Delays
1 ObjectList
Variable
3) Put it together.
For this, we'll create a series of Dynamic
Water Volumes that are all turned off by default, and then we'll
turn them 'on' incrementally. The water volumes are not going
to move. They overlap each other and gradually ascend the pool
in height as shown. You'll probably want to tweak the distances
and timing between them so that a player in it ascends it reasonably.
|

|
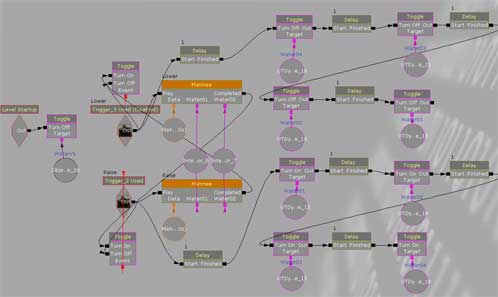
So, basically what we're going to do is turn them on incrementally
with slight delays between them. My overall matinee time is
5 seconds, so I'm going to turn them on at 1 second increments.
If needed, you could assign events to the matinee in a matinee
track and turn them on by using the matinee events. I'm also
going to add a toggle turning them all off initially since the
water will be 'drained' when the system begins. I'll use a Level
Startup Event to do this. I'll use an ObjectList
to hold all the volumes inside one reference to turn them off.
|
|
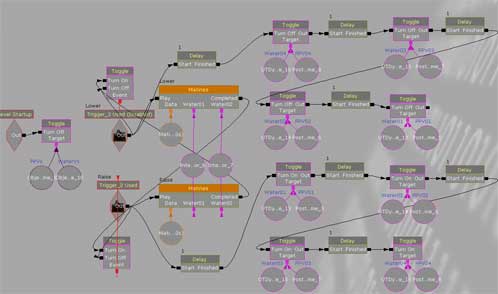
Here's the exact same setup excapt this time I've used matinee
events spaced out at 1 second intervals in Matinee:
|

|
4) Test it. Go in game and test it out. It worked fine for me.
5) Refine it. First, think about the collison and lighting and
get those fixed. Then consider any potential issues. Well, we
have toggles shutting of the appropriate triggers at the appropriate
times and I really haven't been able to think of anything else
so...
One extra thing I have done to 'enhance' the underwater effect
is I've overlapped the Dynamic Water Voumes with PostProcess
Volumes and added them to the system as well. The post process
basically makes it look more 'underwatery'. Here are two screenshots
with the delays and without that include the new volumes.
|
|
Here's the exact same setup except this time I've used matinee
events spaced out at 1 second intervals in Matinee:
|

|
6) Adjust it for Single/Multiplayer. As you may have read in
the SinglePlayer/Co-op/MultiPlayer
section, there are many considerations to take into account
for whichever system you're setting this up for. The system
as it stands I think would be ok for single-player and multiplayer
both. But if you make any serious changes to it, you should
still ask yourself some questions. What happens if two players
are fighting on, around, or in it? Actually, it looks like that
might be ok.
Other Liquids: Changing it to be a Slime, Lava,
Toxic Waste, Juice or other liquids.
Although there are Lava and Slime Volume types, there aren't
any Dynamic versions. However, converting a water volume to
a lava or slime volume is very simple. Create a Lava volume
(or slime) and lock the property box (the lock is in the upper
left of the properties window). Then, create a Dynamic Water
Volume. Now, expand down the properties of the lava volume and
dynamic water volume and change the properties in the dynamic
water volume to match those of the lava volume. When you're
done, they'll function identically. Of course, you'll also want
to choose a new material for your water surface so that it will
look like lava/slime/whatever.
|