I have set up a simple test map consisting of a slab of BSP, a
skylight, a playerstart, a skydome, and a directional light.
I will only be using mostly default editor assets which can
be found in the EditorMeshes and EditorMaterials
packages.
I will be using Movers/Interpactors (the terms are interchangeable)
that are sometimes animated through Matinee. If you need to
learn Matinee, I would recommend Hourences'
Tutorial on them as a starting point.
I added a glass mesh that I found in the HU_Deck package in
the SM/Meshes subfolder (S_HU_Deck_SM_FWindow_Glass). In order
to 'break' glass, there are several methods to do so. I will
only cover the simpler way at this point. There are other more
'realistic' methods, but their cost in terms of performance
still mostly outweighs their 'eye-candy' benefit. If you absolutely
must have a more 'realistic' method, then I would highly reccomend
doing so in limited, isolated circumstances.
*Note: Using the Destruction
tutorial, you should be able to put this together yourself using
the informaiton provided there. In fact, I challenge you to.
However, there are always so many requests for this particular
feature that I feel a little complelled to provide a tutorial
on it.
Breaking Glass: When the player, or bots, shoot
the glass, it will cause it to break. I've set up a very simple
system.
Let's use the 'Cooking' analogy I outlined in the Applications
introduction to set this up:
1) What are we making? Breaking Glass.
2) Gather the ingredients:
1 Interpactor (Glass)
2 Emitters (Glass Shards)
1 Destroy
Action
1 Toggle
Action
1 Take Damage Event
1 PlaySound
Action
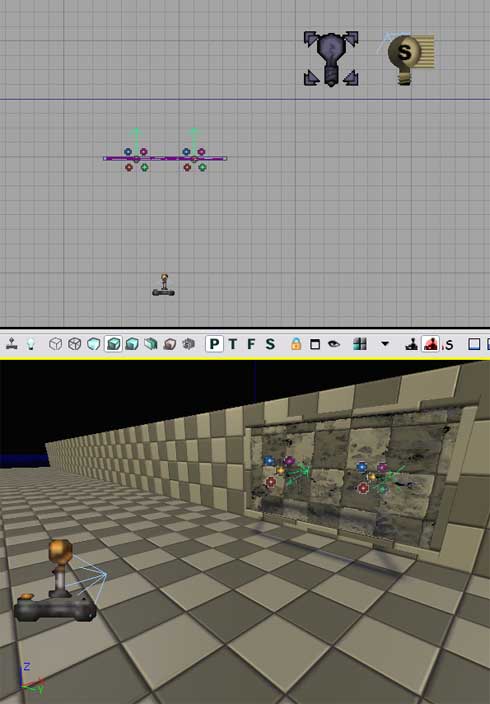
3) Put it together. I've placed the interpactor/glass, and created
a small BSP 'frame' around it. Then I placed the two emitters
in the middle of the glass, a little ways away from each other
so the effect when the glass breaks seems to come from the whole
sheet. I turned off 'AutoActivate' in the emitters' properties.
|
|
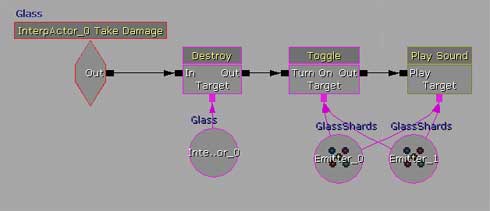
On the kismet side of things, I am going to create a "Take
Damage' event based on the interpactor (make sure its collision
is set to bBlockAll). I'll then destroy the interpactor, and
turn on the emitters. For the Take Damage event, I made sure
to set the MaxTriggerCount to 0, I turned down the DamageThreshold
to 50, and unchecked the PlayerOnly box. I then added a playsound
event to play the sound of breaking glass when the system is
triggered.
|
|
4) Test it. Go in game and test it out. It worked fine for me.
5) Refine it. First, think about the collison and lighting and
get those fixed. Then consider any potential issues. Honestly,
I can't think of any issues here.
But what if we want it to come back after a certain amount of
time. How do we 'respawn' it? The answer is that we don't. Instead
of respawning it and trying to finagle its rotation, settings,
placement, etc... let's just give the illusion that it's gone
so we can bring it back whenever we want. Let's go back to Step
2 and add some ingrediants to the recipe:
2) Gather more ingredients:
1 Toggle
2 Toggle Hidden
2 Change
Collision
1 Delay
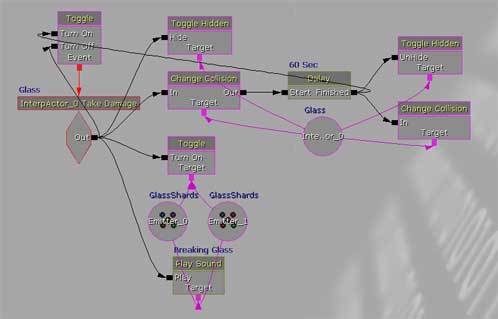
3) Put it together. When the Take Damage event fires, it will
turn itself off using a toggle. At the same time, we'll change
the collision and turn the collision off on the glass (I unchecked
the Block Actors and Collide Actors boxes in the change collision
action). Also, we'll hide the mesh with the toggle hidden, and
we'll toggle on the emitters. Then, we'll delay 60 seconds using
the delay. If you wanted, you could randomize the delay by hooking
up a random float to the delay's target. Coming out of the delay,
we'll unhide the mesh, turn its collision back on (check off
Block Actors and Collide Actors in the change collision action)
and we'll turn the Take Damage event back on using the toggle.
|
|
4) Test it. Go in game and test it out. It worked fine for me.
5) Refine it. First, think about the collison and lighting and
get those fixed. Then consider any potential issues. Honestly,
I can't think of any issues here.
6) Adjust it for Single/Multiplayer. As you may have read in
the SinglePlayer/Co-op/MultiPlayer
section, there are many considerations to take into account
for whichever system you're setting this up for. The system
as it stands might be ok for single-player and multiplayer both.
But you chould still ask yourself some questions. What happens
if one or more players are actually in the window area while
it's broken, and it comes back? Honestly, I don't know - you'll
have to find out yourself.
Looking for something more realistic?
The following is certainly possible but, again, I reccomend
against it solely for performance reasons.
Instead of the simple way above, and if you can model, it is
possible to create a 'pre-broken' glass pane, and import the
pieces individually. Then you can set them up as KActors and
reassemble them in the ediotr to show an 'unbroken' piece of
glass. You can then hook them up to respond to take damage events,
assign their material a glass physical material, and allow them
to be shot out individually.
Potential Problems with this method:
- No 'breaking glass' emitter. You'd have to hook up many, if
not all, of the Kactors to a toggle to toggle on some emitters,
and there will probably be shooting, falling glass, and emitter
firing timing discrepancies that will look odd.
- Floaters: If you have enough pieces, it might be possible
to shoot out individual pieces but have some left over 'floating'
unrealistically. To get around this, I would suggest hook take
damage events to each piece, and have every one of them set
off one RB_RadialImpulse that will knock all of them out.
If you want glass shard left over around the edges, you'll need
two meshes - one for the whole, and one for the broken. You
can easily have the broken-edged one hidden and then unhide
it when the take damage event goes off.
|