I have set up a simple test map consisting of a slab of BSP, a
skylight, a playerstart, a skydome, and a directional light.
I will only be using default editor assets which can be found
in the EditorMeshes and EditorMaterials
packages.
I will be using Movers/Interpactors (the terms are interchangeable)
that are sometimes animated through Matinee. If you need to
learn Matinee, I would recommend Hourences'
Tutorial on them as a starting point.
I added the default mesh cube as a static mesh to the map, converted
it to an interpactor, and then made it very thin. The pivot
is in the center so I will only animate it up and down, or side
to side. A door turning on its hinge requires both a pivot on
one side of it, and some forethought to where the player will
be so as not to squeeze them against a wall.
*Note: Pivots/Origin points on StaticMeshes serve as the 'hinge
points' for interpactors. If you need to create a door, or other
moveable object that revolves, rotates, or swings on an edge,
you'll need to be aware of the mesh's pivot/origin location.
It is impossible to re-assign this pivot permanantly in the
engine. For mesh placement, you can currently temporarily assign
the pivot to a new location, but when you're done, the pivot
will be back at the origin. If you find a mesh that you want
to use as a swinging door, and its pivot is in the center, you
are out of luck. The origin is determined when the mesh is created
in a 3D Modeling application - not in the Unreal Editor.
Proximity Doors: This kind of door is opened
when a player is within a certain radius of the door, and will
stay open until the player leaves. I've set up a very simple
system.
Let's use the 'Cooking' analogy I outlined in the Applications
introduction to set this up:
1) What are we making?
A door that opens when players are close, and bloses when they're far.
2) Gather the ingredients:
Trigger
Trigger Touch Event
Mover (Door)
Matinee
3) Put it together:
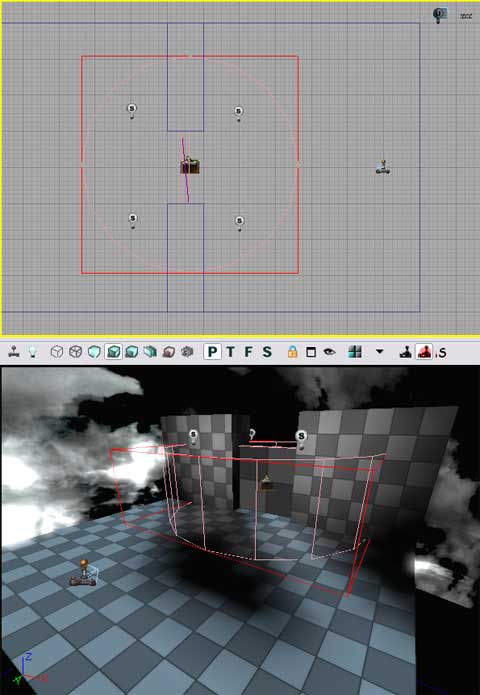
In the level, I've created two walls and placed a thin mover between them. I also added a trigger in the middle of the door and increased its radius.
|
|
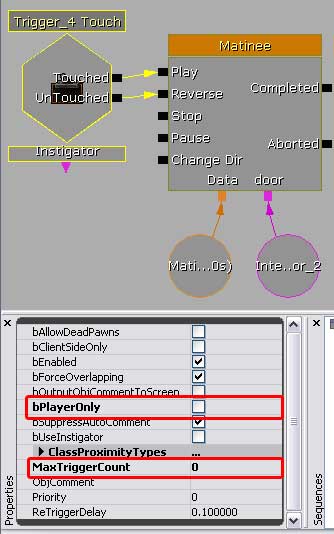
On the kismet side of things, I used the trigger to create a
Trigger 'Touch' event,
and a matinee. I hooked the touch into the play of the matinee,
and the untouch into the reverse. Then I keyframed the matinee
to move the door to the side. Whenever the touch event goes
off, the door will open, allowing the player through, and when
the player leaves the radius of the door, the untouch will fire
and the door will close again. I used a MaxTriggerCount of 0
so the player can do this again and again.
|
|
4) Test it. Go in game and test it out. It worked fine for me.
5) Refine it. Think about any potential issues. Can the player
'out-run' the door and touch it before it's fully open? In the
screenshot above, the lighting is weird on it, so you'll need
to adjust lighting, shadows, and similar settings n the lights
around it. The collision by default is set to none. Is this
ok? or should it be set to something different? How is the movement
- does it look 'natural' or do you need to keyframe some more
details into it? Can the player get stuck behind the door? Or
between the door and the doorframe?
Do you want to add sounds and/or emitters to it? Or change some
lighting for a more visual indication that it's open? This would
be the time to adjust the Kismet to match these situations.
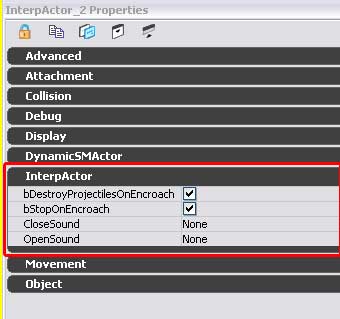
If we wanted to add sounds, we could add them through the interpactor
itself. Open its properties and expand down the 'interpactor'
section as shown. You would select the open/close sounds in
the generic browser and assign them to the appropriate fields.
Just make sure they sound proper once they're in - they don't
play too long or too short, for example. These fields might
only work with the 'Mover'
event, however, I haven't tested that.
|
|
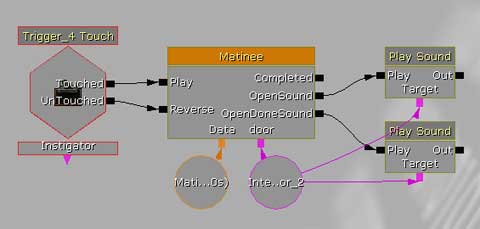
We could also add sounds through the matinee's event track system.
Simply add a new Event Track to the mover group, and add keyframes
to the event track to add events. Each one you add, you'll name,
and then an output will appear on the matinee. Use these to
hook up 'PlaySound' actions. You'll probably need to designate
a target on the PlaySound. The interpactor itself should suffice
as the target, as shown. I've hidden the unused Connectors on
the Kismet entities.
|
|
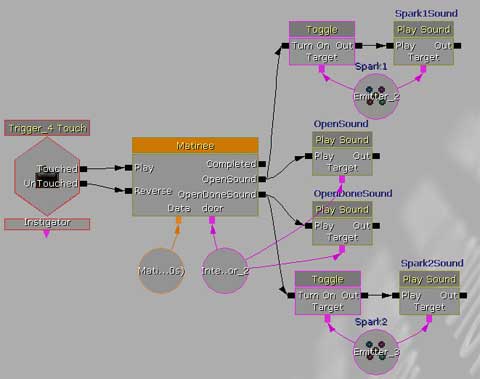
You could even add emitters and sounds for the emitters to the
system. In the image below, I've toggled on two different emitters
based off the sound events, and then added sounds of the spark
emitters and targeted the sparks themselves so it sounds like
the sound is coming from the sparks themselves. I've hidden
the extra connectors. As you can see, you can add a multitude
of effects to a system to enhance it as much as you like. I
could even add toggled lights, or just about anything else.
Also, if I wanted, I could use the 'out's of the door playsounds
to connect to the toggles for the emitters. It doesn't really
matter.
|
|
6) Adjust it for Single/Multiplayer. As you may have read in
the SinglePlayer/Co-op/MultiPlayer
section, there are many considerations to take into account
for whichever system you're setting this up for. The system
as it stands might be ok for single-player. But look at the
'bPlayerOnly' checkbox in the screenshot. I've unchecked it.
That means enemy NPCs could trigger the door to open as well.
Is that what you want? For multiplayer, what happens if two
players hit the trigger's radius? Will it cause the door animation
to stutter? If one leaves, will that trigger the untouch and
therefore cause the other player to be stuck in the doorway?
If I were to set this up for multiplayer, I would add the counters
described in the SinglePlayer/Co-op/Multiplayer
section so that there's no chance of a player getting stuck
or the system breaking. When complete, it would look something
like this:
|

|
After I got the system set up, I right-clicked on the entities
and hid the unused connectors.
|